Diese Seite auf deutsch 

Measuring the Sun's position above the horizon

Details of measurement, evaluation and data submission

  1. Preparation
    1. The ground plain for the shadow must be as horizontal as possible (use, for instance, a ball.).
    2. It is useful to prepare a coordinate system for the ground plain on which the base point of the gnomon is marked and surrounded by circles of increasing radius. CAUTION: You must take care that the shadow's length at the central time and the size of the ground paper fit together!

      You can find examples of such Din-A-1-sheets here: centered gnomon, gnomon at the bottom and gnomon at the top.
    3. The gnomon must be as vertical as possible.

    4. One axis of the coordinate system should point to north (south), as exactly as possible. There are several possibilities for such aligning:
      • The best procedure is to find the exact northern direction during the days before our project day. You can find a detailed instruction here.
      • You can align the system by means of a compass. But because of magnetic declination, this is not a very exact method. You may let National Geophysical Data Center (NGDC) calculate the magnetic declination for your site.
      • You may determine the exact time of your local noon tM using the following formula:

        In this formula, λ means the geogr. longitude of your site and λB the longitude your time zone belongs to. 1:00 hour must be added if you want to get the result in daylight saving time. The equation of time (eot) describes the difference between apparent time and mean time. In the days around our project day, at 12:00 UT the equation of time will have the following values:

        dateeot
        April, 19 th0:01:13
        April, 20th0:01:26
        April, 21th0:01:38
        April, 22th0:01:50
        April, 23th0:02:01
        April, 24th0:02:12
        April, 25th0:02:22
        April, 26th0:02:32

        The equation of time can approximately calculated with the following formula:

        in which t means the number of the date in the year. For January, 1rst, is t=1.

        At t0 the shadow of the pole points to north (south) exactly.
  2. Measurements
    1. If you want to determine the time of noon on our project day you may observe the shadow's path long enough before and after noon to get at least the intersections between the path and one of the circles surrounding the gnomon (see the detailed document).
    2. In order to get the possibility of interpolating you should mark the shadows top one hour before and after the central time t0, first in time intervals of 15 minutes, finally in steps of 5 minutes. Therefore, you should mark positions at

      t0-60min, t0-45min, t0-30min, t0-15min, t0-10min, t0-5min, t0, t0+5min, t0+10min,t0+15min, t0+30min, t0+45min, t0+60min.

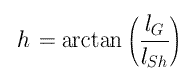
      Your sheet should then view similar to the following picture:

  3. First evaluation and data transmission
    1. Determine the azimuth A and the altitude h of the sun for the central time t0
      • either by directly reading A from the ground plain and deriving h from the lengths lG of the gnomon and lSh of the shadow

      • or by taking use of an excel-sheet which allows you to input either the rectangular coordinates x and y or the polar coordinates A and h. There is an example sheet, too.

      In order to get uniform data please measure the azimuth angle of the sun against south (e. g. the direction of the shadow against north) so that it increases with time. If you live on the southern hemisphere, please measure the angle between the shadow and south and add 180°!
    2. Transmit your result to us via our data exchange page.
    3. It would be nice additionally to get an image showing either your ground plain with your measurements or giving an impression of what was going on during your experiment. The above site offers the possibility of transmitting a picture.
    4. If you have determined the exact time of local noon and the corresponding length of the shadow you will be able to determine your geographical position.

  4. Final evaluation
    1. If you look at the results of all participants (view_table0647, for instance) you will find a measure of the earth's radius for each result. It has been calculated automatically by evaluating the altitude of the sun and the site's distance dss to the sub-solar point.

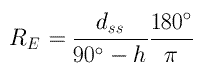
      This value of RE gives you an impression of the precision of the measured positions.

    2. In order to get a real measure of your own of the earth's size, you can combine your result with those of other distant observers. For that, you must
      1. calculate the distance1 d between the sites (perhaps with the help of National Oceanic and Atmospheric Administration's National Weather Service (NOAA) and
      2. calculate the angular distance Δ between the to geographical positions of the sites. The following picture suggests the complexity of the appropriate algorithm.

        It may be performed by a little program. The zipped archive also containes a description of the algorithm.
      The above mentioned algorithm needs the momentary declination of the sun as an additional input. A possibility of measuring this parameter is implied in the description of the algorithm.

back to the project page


1 To be truly we must emphasize that the evaluation normally becomes circular at this point: We want to measure the earth's radius but we use it by calculating the distance between the observers from their geographical positions! The only way of breaching this circle would be to measure the needed distance by oneself: by bike, by car, ... Perhaps some measures of quite near observers will be exact enough to evaluate their results, to measure their distance and to get a satisfying - and circle-free! - value of the earth's radius.


Udo Backhaus

last change:  last update: 2020-03-03